This page is intended to give a clue about the UO protocol to developers who are not familiar with it.
NOTE - This page is just to explain the protocol, not to see the packets' contents: if you just want to see the packets, all you have to do is turn of the Razor's packet logging feature.
In order to continue reading this page, you should install Wireshark (or a similar tool). This tool lets you see what actual bytes client and server are sending to each other.
It also has a Windows installer (see the download section); the site has plenty of documentation - for our use, for example, if the server listens on port 2593 (usually the default), you can read all what's happening between client and server with this filter:
tcp.port == 2593 and tcp.flags.push == 1
The push flag is about priority, I just figured it out by seeing that only packets with this flag actually carried data.
To show you how to get started with the UO protocol, I'll (try to!) guide you through what happens between client and server from when the client enters user and password up till the you see the character on the screen.
Client and server communicate with each other using a TCP connection; therefore, you can start up:
There are plenty of guides to do this; anyway you do it, you'll end up with a console like this:
RunUO - [www.runuo.com] Version 2.1, Build 4050.32053
Core: Running on .NET Framework Version 2.0.50727
Core: Optimizing for 2 processors
Core: Unix environment detected
Scripts: Compiling C# scripts...done (cached)
Scripts: Skipping VB.NET Scripts...done (use -vb to enable)
Scripts: Verifying...done (2293 items, 530 mobiles) (0.35 seconds)
Regions: Loading...done
World: Loading...done (68 items, 3 mobiles) (0.22 seconds)
ServerList: Auto-detecting public IP address...done (79.32.6.204)
Restricting client version to 5.0.6d. Action to be taken: LenientKick
Listening: 127.0.0.1:2593
Listening: 10.0.0.101:2593
Razor is also very easy to install and use; just make sure you configure it to connect to localhost, port 2593 - you will then be able to login with an already created character; so, if necessary, log in the server, create a character and then log out again. This is because you'll have to log in only when Wireshark reads all that client and server are sending to each other; otherwise you won't be able to read it!
It's worth mentioning, as will repeated later on, that the UO protocol requires that (among other things):
Now, a very nice feature of Razor is the removal of the encryption. In order to do this, Razor "sits" between client and server acting as a network gateway for the client:
By doing this, Razor accepts each client's message, decrypts it and then sends it to the server; also, it accepts each server's message and delivers it directly to the client (still compressed).
So, before logging in, let's start up Wireshark. Make sure you select the loopback interface (which correspond to IP 127.0.0.1 and is usually named lo) and that you set the following filter:
tcp.port == 2593 and tcp.flags.push == 1
By doing this, you'll see all the packets that client and server exchange between each other; if you now log in with your newly created character, you'll see something like this:

Play with the packets a bit; in particular, see how the various stacks have their "payload" (protocol information part) in each packet - you can expand the payload for each protocol by clicking on the plus (+) on the left side of it; for example, to inspect what TCP information is carried on packet number 4 (the first), you go like this:

If you then re-collapse the TCP information, and place your mouse on the "Data" section, the program will select the actual data being sent in the packet on the tab below:

At this point, I'll mention a very nice feature of Wireshark called Follow TCP Stream. Just right-click that first packet, and select Follow TCP Stream. A window like this will pop-up:

In this window, all the request-response messages are clearly printed in different colours; particularly useful, is the "C arrays" representation of the packets (you can select it on the bottom-right corner of the window), which will render something like this (they're all hexadecimal numbers):

where peer0 and peer1 are the client and the server, respectively.
At this point you might notice something: what you see on the TCP stream window is much shorter than what you see on the wireshark main window; this is because the filter we selected said to grab all the packets that were going to or from TCP port 2593, but this does not necessarily mean that only one TCP connection is involved! And when you click on "Follow TCP Stream", only the packets belonging to the same connection as the packet you right-clicked on will be printed in the TCP stream window.
Therefore, by right-clicking on the first packet and displaying the TCP stream from there, you actually asked for "all the packets that belonged to the same TCP connection as the first packet".
What's actually behind all of this, is that the login protocol requires that the client:
It's therefore necessary to distinguish the two TCP streams, because the "Follow TCP Stream" will only follow one of these stream, depending on which packet you selected when you activated it.
Now, in order to distinguish these two TCP streams, you'll have to inspect the Stream index field that can be found by expanding the "Transmission Control Protocol" (TCP) section of the packets as you did before - just click on the "+" beside the first packet: it will now stay expanded for all the packet you click on:
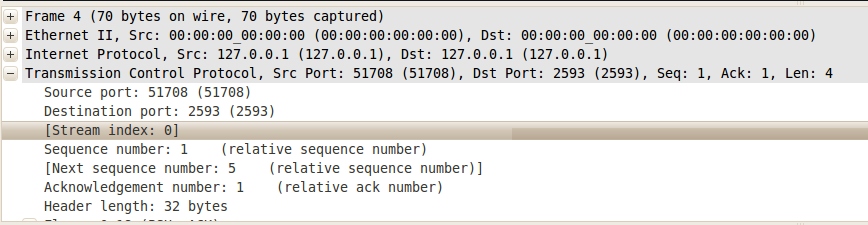
For example, the first packets (from number 4) have a stream index equal to zero; then, scrolling down on the packets below, you'll find at one point it will increase, becoming 1 (this actually happens at packet number 19):

Therefore the "boundaries" of the two streams are as follows:
Now that we know this, we'll just have to:
By doing this, you'll end up having two windows, each of which will display one of the two conversations (i.e. streams), with the visualization format shown above. As you've seen before, the first stream is very short, while the second is quite long.
If you now copy both of them into two new text files and replace peer0 and peer1 with CLIENT and SERVER, respectively, you'll have obtained something to start with in order to understand the login session.
For the pre-login phase (Stream index = 0), you'll end up with having something like this:
char CLIENT_0[] = {
0x82, 0x4a, 0xe6, 0x73 };
char CLIENT_1[] = {
0x80, 0x75, 0x73, 0x65, 0x72, 0x00, 0x00, 0x00,
0x00, 0x00, 0x00, 0x00, 0x00, 0x00, 0x00, 0x00,
0x00, 0x00, 0x00, 0x00, 0x00, 0x00, 0x00, 0x00,
0x00, 0x00, 0x00, 0x00, 0x00, 0x00, 0x00, 0x70,
0x73, 0x77, 0x00, 0x00, 0x00, 0x00, 0x00, 0x00,
0x00, 0x00, 0x00, 0x00, 0x00, 0x00, 0x00, 0x00,
0x00, 0x00, 0x00, 0x00, 0x00, 0x00, 0x00, 0x00,
0x00, 0x00, 0x00, 0x00, 0x00, 0x5d };
char SERVER_0[] = {
0xa8, 0x00, 0x2e, 0x5d, 0x00, 0x01, 0x00, 0x00,
0x52, 0x75, 0x6e, 0x55, 0x4f, 0x20, 0x54, 0x43,
0x00, 0x00, 0x00, 0x00, 0x00, 0x00, 0x00, 0x00,
0x00, 0x00, 0x00, 0x00, 0x00, 0x00, 0x00, 0x00,
0x00, 0x00, 0x00, 0x00, 0x00, 0x00, 0x00, 0x00,
0x00, 0x01, 0x01, 0x00, 0x00, 0x7f };
char CLIENT_2[] = {
0xa0, 0x00, 0x00 };
char SERVER_1[] = {
0x8c, 0x7f, 0x00, 0x00, 0x01, 0x0a, 0x21, 0x60,
0xb5, 0x5f, 0xe2 };
This, instead, will be the second phase (Stream index = 1):
char CLIENT_0[] = {
0x60, 0xb5, 0x5f, 0xe2 };
char CLIENT_1[] = {
0x91, 0x60, 0xb5, 0x5f, 0xe2, 0x75, 0x73, 0x65,
0x72, 0x00, 0x00, 0x00, 0x00, 0x00, 0x00, 0x00,
0x00, 0x00, 0x00, 0x00, 0x00, 0x00, 0x00, 0x00,
0x00, 0x00, 0x00, 0x00, 0x00, 0x00, 0x00, 0x00,
0x00, 0x00, 0x00, 0x70, 0x73, 0x77, 0x00, 0x00,
0x00, 0x00, 0x00, 0x00, 0x00, 0x00, 0x00, 0x00,
0x00, 0x00, 0x00, 0x00, 0x00, 0x00, 0x00, 0x00,
0x00, 0x00, 0x00, 0x00, 0x00, 0x00, 0x00, 0x00,
0x00 };
char SERVER_0[] = {
0xb3, 0x33, 0xc9, 0x97, 0x40, 0x81, 0x7a, 0xa4,
0xd9, 0x60, 0xb3, 0xb0, 0x7a, 0x38, 0x7c, 0x80,
0x00, 0x00, 0x00, 0x00, 0x00, 0x00, 0x00, 0x00,
0x00, 0x00, 0x00, 0x00, 0x00, 0x00, 0x00, 0x00,
0x00, 0x00, 0x00, 0x00, 0x00, 0x00, 0x00, 0x00,
0x00, 0x00, 0x00, 0x00, 0x00, 0x00, 0x00, 0x00,
0x00, 0x00, 0x00, 0x00, 0x00, 0x00, 0x00, 0x00,
0x00, 0x00, 0x00, 0x00, 0x00, 0x00, 0x00, 0x00,
0x00, 0x00, 0x00, 0x00, 0x00, 0x00, 0x00, 0x00,
0x00, 0x00, 0x00, 0x00, 0x00, 0x00, 0x00, 0x00,
0x00, 0x00, 0x00, 0x00, 0x00, 0x00, 0x00, 0x00,
0x00, 0x00, 0x00, 0x00, 0x00, 0x00, 0x00, 0x00,
0x00, 0x00, 0x00, 0x00, 0x00, 0x00, 0x00, 0x00,
0x00, 0x00, 0x00, 0x00, 0x00, 0x00, 0x00, 0x00,
0x00, 0x00, 0x00, 0x00, 0x00, 0x00, 0x05, 0x61,
0x1b, 0xe6, 0xf0, 0x00, 0x00, 0x00, 0x00, 0x00,
0x00, 0x05, 0xe4, 0x0f, 0x36, 0xa3, 0xf0, 0x6c,
0x7a, 0x66, 0x40, 0xb6, 0x5b, 0x3f, 0x9f, 0xf2,
0xce, 0x00, 0x00, 0x00, 0x03, 0xe8, 0xc8, 0x3c,
0x7c, 0x46, 0x80, 0x00, 0x00, 0x00, 0x00, 0x00,
0x02, 0xf2, 0x07, 0x9b, 0x67, 0x3a, 0x43, 0xe3,
0xd2, 0x35, 0xab, 0xc8, 0x00, 0x00, 0x00, 0x00,
0x11, 0x4e, 0x43, 0x83, 0x9b, 0xa4, 0x1e, 0x20,
0x00, 0x00, 0x00, 0x00, 0x00, 0x1c, 0xdb, 0xfc,
0xf9, 0xcd, 0x6e, 0x72, 0x1f, 0x9e, 0x98, 0x2e,
0xd6, 0xb1, 0xb8, 0xf1, 0x00, 0x00, 0x00, 0x01,
0xa2, 0x33, 0xc7, 0x8e, 0x2e, 0x16, 0xaf, 0x17,
0x80, 0x00, 0x00, 0x00, 0x00, 0x00, 0xbc, 0x81,
0xe6, 0xde, 0x6c, 0x6a, 0x07, 0x86, 0xae, 0x90,
0xdd, 0xad, 0x63, 0x71, 0xe2, 0x00, 0x00, 0x00,
0x07, 0x55, 0xe8, 0x70, 0x78, 0xbb, 0x41, 0x8d,
0x00, 0x00, 0x00, 0x00, 0x00, 0x00, 0x5e, 0x40,
0xf3, 0x6a, 0xf4, 0x3e, 0x88, 0xaf, 0x2d, 0x5e,
0x61, 0xb8, 0x0e, 0xd6, 0xb1, 0xb8, 0xf1, 0x00,
0x00, 0x00, 0x28, 0x46, 0x74, 0x70, 0xc1, 0xe3,
0x1b, 0x07, 0xa0, 0x00, 0x00, 0x00, 0x00, 0x00,
0x0b, 0xc8, 0x1e, 0x6d, 0x48, 0xc3, 0xf3, 0xd3,
0x35, 0xa8, 0x7f, 0x10, 0xf8, 0xbb, 0x5a, 0xbd,
0xd1, 0x15, 0xe6, 0x1f, 0x10, 0x00, 0x03, 0xbb,
0xba, 0x07, 0x96, 0xaf, 0x18, 0x20, 0x00, 0x00,
0x00, 0x00, 0x00, 0x02, 0xf2, 0x07, 0x9b, 0x51,
0x9e, 0x61, 0xc6, 0xf9, 0xe3, 0xd2, 0x1b, 0x3a,
0xd6, 0x37, 0x1e, 0x20, 0x00, 0x00, 0x00, 0xcb,
0x9a, 0xb0, 0xe9, 0x0f, 0xa5, 0xb3, 0x90, 0xfa,
0x79, 0x00, 0x00, 0x00, 0x00, 0x00, 0x17, 0x90,
0x3c, 0xdb, 0x8f, 0xe8, 0xd5, 0x1b, 0xe3, 0x8f,
0x98, 0x6e, 0x03, 0xb5, 0xac, 0x6e, 0x3c, 0x40,
0x00, 0x00, 0x0e, 0x09, 0x5f, 0x97, 0x6b, 0x1f,
0x30, 0xc0, 0x00, 0x00, 0x00, 0x00, 0x00, 0x05,
0xe4, 0x0f, 0x36, 0xb1, 0xa1, 0xf8, 0xe3, 0x7f,
0x8f, 0x1c, 0x96, 0xb1, 0xb8, 0xf1, 0x00, 0x00,
0x00, 0x01, 0x89, 0x0f, 0xd1, 0x15, 0xe7, 0x88,
0x00, 0x00, 0x00, 0x00, 0x00, 0x00, 0x22, 0x29,
0x3e, 0x61, 0xf4, 0xe9, 0xc5, 0xc0, 0x76, 0xb5,
0x19, 0xd3, 0x8b, 0xb4, 0x1f, 0x1c, 0x40, 0x00,
0x00, 0x00, 0x16, 0xe7, 0x7d };
( ... cut ... )Now, there's still one more step to actually read all of this. Thing is, the server uses a compression algorithm when sending packets to the client (fortunately, Razor removes the encryption for us; otherwise, we would have to deal with it, too :D), but only after the pre-login phase, which is to say, after the client has sent the 0x91 packet (the second message in the second stream), therefore, starting with SERVER_0, the server messages have to be decompressed to be interpreted. Fortunately, this is very easy to do!
In order to do this, just navigate to the JUOServer source folder and type (by now I only wrote a script for Linux, a Windows version will come up soon):
$ ./packets d
Reading lines (ctrl-D to interrupt the stream)...
where "d" stands for decompress; now you simply can paste the packet you want to decompress, type ctrl-D to close the input stream and let the script translate the packet.
For example, this is a so-called Client Version Request packet which is sent compressed by the server:
char SERVER_73[] = {
0x78, 0x83, 0x4d };
To decompress it, just start the script and paste the packect contents:
$ ./packets d
Reading lines (ctrl-D to interrupt the stream)...
0x78, 0x83, 0x4d
Read 1 lines.
BD0003
$
The decompressed packet is BD0003 (three bytes, in hexadecimal format); as you can see from here, when sent by the server the packet is three bytes long, and the second and third bytes represent the packet length (as always is the case): 0003. As you might have guessed, the first byte in each packet represent the packet code.
To see a whole login conversation, I provided this sample file.
There's finally one more detail you should be aware of when reading packets: the server intentionally splits the sending of packets into maximum 512-sized chunks (the sample file has an example of this), so if you see two packets, the first of which is 512 bytes long and the second one is, say, 64 bytes long, you very likely should decompress them together, copy-pasting them both in one time, otherwise what you'll get for the second packet will not be the right thing.
